Wednesday, December 19, 2018

Raspberry Pi Controlled Humanoid Robot

I am rebuilding the humanoid robot from a few years back, but this time it has a Raspberry Pi controlling it via a PCA9685 controller.

Here is the video:


At one point he fell apart and had to be rebuilt.

I crunched the code, now it is much shorter.

# PCA9685 Servo controller for 16DOF humanoid
#
# 01234567890 = select servo 0-15
# Z = Center all servos
# -,+ = Decrease, increase servo
# Range is 20-90-160
# q=quit

import curses
import RPi.GPIO as GPIO
import time
from SunFounder_PCA9685 import Servo

# Turn on instant key response
key = curses.initscr()
#curses.cbreak()
key.keypad(1)
key.nodelay(1)

# Set default positions
s=[90,90,90,90,90,90,90,90,90,90,90,90,90,90,90,90]
sservo=0
r=[90,70,70,90,90,90,90,90,90,90,90,90,90,90,90,90]
l=[90,90,90,90,90,110,110,90,90,90,90,90,90,90,90,90]
w=[90,90,90,90,90,90,90,90,70,120,120,20,90,90,90,90]
f=[90,90,90,90,90,90,90,90,90,90,90,90,90,90,90,90]

# Set up servos
myservo = []
for i in range(0, 16):
        myservo.append(Servo.Servo(i))  # channel 1
        Servo.Servo(i).setup()

while True:
    char = key.getch()
    if char == ord('q'):
        break
    elif char == ord('1'):
        sservo=1
    elif char == ord('2'):
        sservo=2
    elif char == ord('3'):
        sservo=3
    elif char == ord('4'):
        sservo=4
    elif char == ord('5'):
        sservo=5
    elif char == ord('6'):
        sservo=6
    elif char == ord('7'):
        sservo=7
    elif char == ord('8'):
        sservo=8
    elif char == ord('9'):
        sservo=9
    elif char == ord('0'):
        sservo=0
    elif char == ord('!'):
        sservo=11
    elif char == ord('@'):
        sservo=12
    elif char == ord('#'):
        sservo=13
    elif char == ord('$'):
        sservo=14
    elif char == ord('%'):
        sservo=15
    elif char == ord(')'):
        sservo=10

    elif char == ord('r'):
        for i in range (0,16):
          s[i]=r[i]
    elif char == ord('l'):
        for i in range (0,16):
          s[i]=l[i]

    elif char == ord('w'):
        for i in range (0,16):
          s[i]=w[i]
     
    # Zero servos (90 degrees)
    elif char == ord('z'):
       for i in range (0,16):
           s[i]=90

    elif char == ord('-'):
        for i in range (0,16):
          if (sservo==i):
            if (s[i]>20) : s[i]=s[i]-2
                 
    elif char == ord('='):
        for i in range (0,16):
          if (sservo==i):
            if (s[i]<120 :="" i="" p="" s="">           
    print sservo
    # Send info to servos
    for i in range (0,16):
            myservo[i].write (s[i])

    time.sleep(0.1)

# Close down properly
curses.nocbreak()
key.keypad(0)
curses.echo()
curses.endwin()
# GPIO.cleanup()


Tuesday, December 11, 2018

An idea of how to make a 3D TV set.

Has anyone ever tried taking two LCD screens, placing them one over the other and using a common backlight to make a 3D TV?  Since every TV channel is now 4 channels they could easily broadcast an offset image on two sequential channels to come up with a 3D image.  I am not sure the backlight would be able to penetrate both screens or how that would react to having two screens in front of it.

Friday, November 30, 2018

DIY 6 DOF Robotic Arm Project

I have been building a 6 DOF Robotic arm by reverse engineering the ones found on eBay.  The only new part is the lazy Susan at the base.  That base looks a lot better than the ones on eBay.  All the other parts were laying around left overs from my Humanoid robotics projects.


Here is a video of it running with a Raspberry Pi.


This video is of a Raspberry Pi running it with a PCA9685 controller.


Here is the Arduino powered setup video, YouTube has made it difficult to embed a video....

Friday, November 9, 2018

I am building a 5DOF Humanoid Robot hand


I recently purchased a 5 DOF metal humanoid robot hand.  It comes with instructions but they are written in translated English.  Also some of the pictures are out of date as parts have changed since they were taken.
This is the eBay ad.

Here are the parts that were supplied to make the fingers.  There are some spare parts included with the kit.


Here is the thumb and the fingers once assembled.


This is the frame assembled, the rods on the right are two parts that are screwed together.

This is what it looks like with the servos installed.  Some of the threaded rod lengths are off 1mm from the instructions.


This is the top view of the assembly.  Note that the metal rod holder for holding down the wire ties is "D" shaped and does not look like what is in the instructions.

The next step is to add the wire ties. Screws go into the heads of the wire ties and clamps hold the other end.

Here is the back side with the wire ties in place. 

Here is the first video using an Arduino:

This is a second video this time using an Arduino with an array:

This next video is of an Arduino Uno running two hands.

Now we have a Raspberry Pi running two hands working with a PCA9685 Driver.


Monday, November 5, 2018

Shure Wireless Microphone Repair

I recently had to replace the power switch in a Shure wireless microphone.  If your microphone will not turn on, try replacing the switch.  It might be bad and still "click" when you press the button!  When I tested the last one with a volt meter it was about 500 ohms when pressed.

You need to remove the two screws that hold the battery holder in place and remove the battery holder.  Then remove the three piece power switch panel as well.

Then you need to remove the "C" clip that holds the guts inside the shell.  Small needle nose pliers can sometimes get the clip out.

Then all the guts should come out of the microphone.  There is an additional part or two to remove and the piece that fits around the on off switch was missing.

Here is a picture of the new on off switch.  I soldered it using the head mounted magnification lenses.


This picture shows all of the guts.

Wednesday, October 3, 2018

Rebuilding my CNC with T Slot aluminum and Fully Supported Linear Rails Part 2

I have been rebuilding my CNC with T Slot aluminum and Fully Supported Linear Rails.  Now I am testing it with a Laser to see its accuracy.  I built my own laser by buying the laser, the housing, the heat sink and the controller separately.  Its a 2 watt laser but the power is throttled back to just burn the material.

Here is the video on youtube:


The accuracy is greatly improved!  The X axis used to have some play in it but now it is right on the money.

The fan power pin on the laser controller is backwards from all of the other connectors.  You will need 5-9 volts on the analog connector to turn the laser on.  The blue trimmer sets the laser power.

How much has the continuously supported rails improved the CNC?  Check out the next two pictures for before and after accuracy.  Pay particular attention to the right side of the R and D.
After upgrade result:


Monday, September 17, 2018

2018 Lancaster NY Hamfest

The 2018 Lancaster NY Hamfest is over.  It might be the last one for me this year unless I go to the one in Elmira NY.

This is my display. I had already sold some stuff!
 This was a really neat home made 811 tube RF amplifier.
 This vendor had lots of antique radio's.
More of the same vendor stuff.
 How is this for a beautiful radio?  Its a "Scott Tuner" but not HH Scott!
 Here is a couple of beautiful Heathkit radio's.
  This is what the hamfest looked like from half way down one isle.
.

Monday, September 10, 2018

Home Repairs/Upgrades

 I recently replaced the lattice in my carport with the heavy plastic.  The panels are called "26 in. x 8 ft. Polycarbonate Roofing Panel in Clear" I did it because one of my neighbors threw out the panels.  Then I replaced the slats that were on my deck with the lattice.

This picture is what the carport looked like half done.

This is what the carport looked like when it was almost done.

This is the old deck rail slats being removed. I had already started replacing the slats with lattice when I took the picture.

This is the new deck rail with lattice installed and painted.

Sunday, September 9, 2018

Chevy HHR Exhaust coupling repair

My HHR started sounding more like a tractor.  I could not see the problem but I could feel the heat coming from this joint.  As you can see it was rusted out.
I purchased two 2 inch pipe clamps at the local car parts store.  They are Ni Exhaust Solutions "Split Flange".  Each one comes with two bolts.  They have to be pried apart and worked back and forth until they open and close.  Then, open one side of both clamps and put a bolt through the closed sides.  Then rotate them into place so the first bolt is above the fitting.  Then close the flanges and install the lower bolt.  It took me over an hour to close the lower flanges.  If you can get them close to closed you can get a flat blade screwdriver in there and close them the rest of the way.  Then install the lower bolt.  That took a long time as well.  One of the issues is the metal gasket gets in the way.  I think I managed to damage the gasket as once it was together it still leaked.  But at least the pipes were not going to fall off the car!

Here is the clamp once installed.  It was hard to tighten the upper bolt as the socket set would not click in the short space.
Split Flange Clamps

It still leaked so I covered the whole thing with J-B Weld "Muffler Weld" Cement. 
J-B Weld Muffler Cement
That solved the problem for now.  I know that eventually I will need a new exhaust but for now the leak is fixed.


Friday, August 31, 2018

Comparing 2018 LED projector models

2017 Projector brightness ratings in Lux. (See previous post)

Epson EMP-S1     Rated: 1200 lumens     Tested: 460 Lux
Pyle PRJD907      Rated: 2000 lumens     Tested: 230 Lux
No Name CL312   Rated: 2000 lumens     Tested: 100 Lux (Note: damaged LCD)
Pyle PRJG65        Rated: 150 lumens       Tested: 30 Lux
Erisan                   Rated: 1200 Lumens    Tested: 40 Lux
Crenova XPE460 Rated: 1200 Lumens    Tested: 60 Lux

2018 Projector brightness in Lux.

Dell 1201 DLP           Res: 800x600       Rated: 2000 Lumens    Tested: 600-800 Lux
Fugetek FG-857        Res: 1280x800     Rated: 2300 Lumens    Tested: 80-200 Lux
Blusmart LED 9400   Res: 800x600       Rated: 1800 Lumens    Tested:  30-60 Lux

Comments: 
FG-857 is big and bright with a great native resolution too.
LED 9400 is bright for its small size.

Testing the FG-857:


Testing LED 9400:


Testing the Dell 1201 projector:


Monday, August 20, 2018

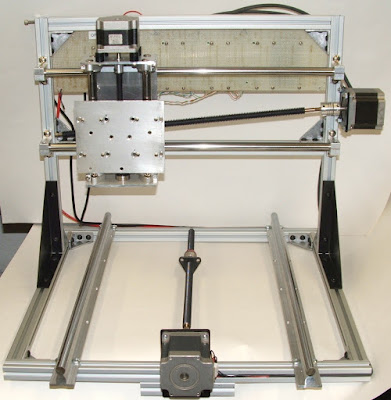
Rebuilding my CNC with T Slot aluminum and Fully Supported Linear Rails.

I am rebuilding my CNC with T slot aluminum extrusions, fully supported linear rails and a smaller Z axis.  My book "Inexpensive CNC Projects has been my best selling book for 2 years.  During that time I have added USB interface with an Arduino Uno and a Laser.  Now I am changing the frame to T slotted aluminum among other improvements.  I was able to get a great deal on six pieces of 18" 2020 aluminum extrusion.  Then I had them professionally cut to length.  Afterwards I discovered that the 16.5 length should have been a little shorter.  The length was based on 18" -(2 x 20mm).


Once I got the frame together this is what it looked like.  The red bearings were problematic as the outside diameter is 7/8" and I could not find anything that fit them.  That is about 22 mm diameter.  There are some 22 mm clamps that are used on Drones but they are wimpy as they were not designed for use on a CNC machine.
T Slot CNC Frame

The new Z axis is only four inches wide.  This next picture shows the new Z axis in front of the old six inch wide Z axis.
New Z Axis
These are some things I have learned about 2020 T slot aluminum:
1. A 10-32 screw fits the T slot nuts.
2. A 10-32 Truss head screw head fits the T slots.
3. A standard 10-32 nut, once filed slightly, fits the T slots.

Here is my current state of construction, the fully supported rails and matching bearings is a huge improvement well worth the $40.
T Slot CNC being assembled
Here is a close up on the experimental Z axis with 22mm Drone clamps holding the bearings.
Close up of Z axis
GRBL has changed since my book was written.  You now have to manually extract the zip file and copy the "GRBL" directory to the Arduino/Libraries/ directory.
Installing GRBL

Then to load GRBL select grblUpload and open it.
Loading GRBL
Then when you upload it you will get an error message.
GRBL Error
Then when you run G Code Sender select 115K for the communications speed.
Next set your steps per mm as in $100=320, $101=320.
Then check to see if a 10 mm move in X and Y move exactly 10 mm.
Then check to see if a 100 mm move is in fact 100 mm.
Next attach a marker and print something.
I found a file that prints a 5 inch ruler that is a nice test of the CNC.

Here are the drawings for the smaller Z axis.  Sorry the drawings are from Visio not Autocad.

Z Back:
Z Front:


Z Top (and Z bottom with no holes for stepper motor):


Z Back for Continuously Supported 12mm X axis (1" x 1.1" or 26 x 28 mm bearings):
Note that 10-32 screws will fit the 12 mm bearing blocks.


Wednesday, July 25, 2018

2018 Batavia NY Hamfest

I bought a "new to me" Canon SX160 camera at the Batavia Hamfest.  It has 16x optical zoom (64x with digital) and 16 Megapixels.  It also does great video.  Here are some pictures I took with it.


There was some space for more vendors as seen in this picture.  There were three isles of vendors.  I was just testing the camera so I did not catch anything interesting.

Now to get the pictures from my Sony camera that hopefully shows more vendors.  Here is my carload of stuff for sale.

Here is a look down one of the isles of stuff for sale.